How To Fix 100% Disk Usage in Windows 10
Looking to fix 100% disk usage in Windows 10? Then here is a step by step guide.
Then here is a step by step guide to fix this issue in windows 10. Let's get started.
You have opened your device manager and saw 100% disk usage indicating that your PC is consuming 100% disk.
This leads to unresponsiveness and degrades the performance of your Windows 10 PC. And the worst part is that you have restarted your PC and still the problem persists.
So, if you are facing these issues and your computer is not performing well and you are looking to fix 100% disk usage error, then don't worry we have got your back.
In this guide, we will look at various ways to fix 100% disk usage in Windows 10. So follow the guide and see after each step if the problem is fixed or not. Let's get started.
Check What Causes Task Manager Disk 100 Usage Error
The first and foremost thing you should do before doing anything is to check what actually is causing this 100% disk usage uses in windows 10.
There is a quick and easy way that lets you check what is causing this error. and you can do it using the windows task manager.
Follow these steps to check the issue in the windows task manager.
- Open windows task manager by using the
ctrl + shift + ESCkey shortcut.
Alternatively, you could also open the task manager by searching for the task manager in Windows search manager.
- Once the task manager is opened. In the processes tab, click on Disk columns and see which process is using the 100% disk usage error.
If the problem is caused bu the third party software then just ending the process will fix the error.
If you are not sure about the error and the problem is with other services of windows 10 then follow this step by step guide.
How To Fix 100% Disk Usage in Windows 10
1. Fix 100% Disk Usage due to Google Chrome
One of the most common issues for causing high disk usage is resource hunger google chrome. Its web page pre-load feature is the one that is causing this error in windows 10.
So, if notice Google Chrome in task manager is causing this 100% disk usage error. then turning off this feature most probably fixes the error.
To disabled pre-load features follow the steps.
Open Google Chrome
On the right upper corner click on three dots and then click on settings.
Now on the left side, click Privacy and Security and then click more.

- Now disable/uncheck Preload pages for faster browsing and searching.
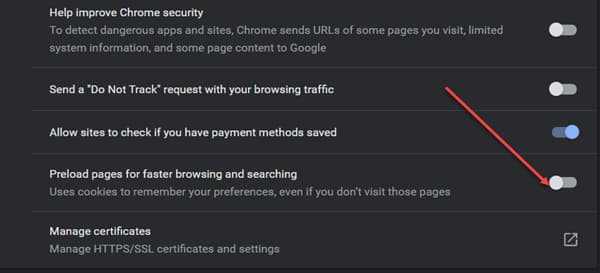
After using this setting off, restart the browser and check if it fixed the high disk usage issue.
If not, then one of the malicious extensions might also be causing the issue, they disabling the extensions and check if the issue persists.
If after doing all these steps, still the problem exists and you can see Google chrome is causing 100% disk usage in the task manager. then its time to uninstall it and move to other browsers like Firefox or Brave.
Brave is the perfect choice if you love the chrome ecosystem as it built on top of Google chrome and is more [privacy-oriented](/best-private-search-engines/) than Chrome.Moreover, you don't need to use any adblocker or anything, it has all built-in.
2. Fix 100% Disk Usage due to Skype
The second and one of the main reasons for causing high disk usage in windows 10 for many users is Skype. If you don't use skype then it is better to uninstall it as it comes pre-installed with Windows 10.
The main reason skype is responsible for this issue has to do with write permission for ALL APPLICATION PACKAGE group.
So to fix 100% disk usage follow these steps:
First of all, you need to quit skype from the taskbar. So, Right-click on skype icon and click Quit.
Now run window by pressing Windows key + r shortcut and type or paste the following location. You can also head over to this location manually
C:\Program Files (x86)\Microsoft\Skype for Desktop
Right-click on the "Skype.exe" application file and choose "Properties".
Under the "Security" tab and select "ALL APPLICATION PACKAGES" and click edit.
On the security window, select ALL APPLICATION PACKAGES, and check the "Write" box. And then click apply and then ok.
Now check if the problem still persists in the task manager. If the problem is with Skype then doing this will fix the error.
3. Fix 100% Disk Usage due to Windows Search
Windows search can be quite handy but sometimes it can also result in a 100% disk usage problem in windows 10.
So, if the disk usage error is because of windows search service then you can disable it. What causes the error is due to the search loops bug in the windows.
But I would recommend temporarily disable the search service and see if the problem is fixed. If the problem is fixed then you should permanently disable the Windows search service.
If not, then there is something else that is causing the high disk usage issue.
Temporarily Disable Windows Search
- Open Command prompt as admin by pressing Windows + X key and then selecting Command Prompt (Admin).

- Now type the following command and press enter.
net.exe stop “Windows Search”
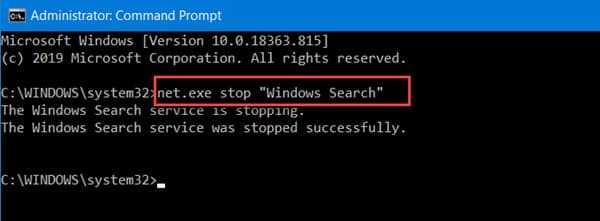
Now check the disk usage in task manager, if the issue is fixed, then the Windows search service is causing 100% disk usage, so you might want to permanently disable search service.
So proceed to the second part.
And in case, the problem is not fixed, then there is nothing wrong with the search service and you can re-enable it by restarting your PC or using the following command in cmd.
net.exe start “Windows Search”
Permanently Disable Windows Search
- Open window run by using the Windows + r key shortcut. and type "services.msc" and hit enter.
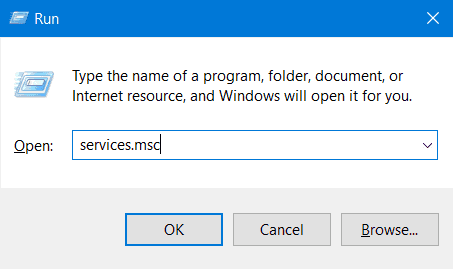
Now locate "Windows Search" and double-click on it to open the Properties Window.
Under the General tab, change the startup type to disabled.
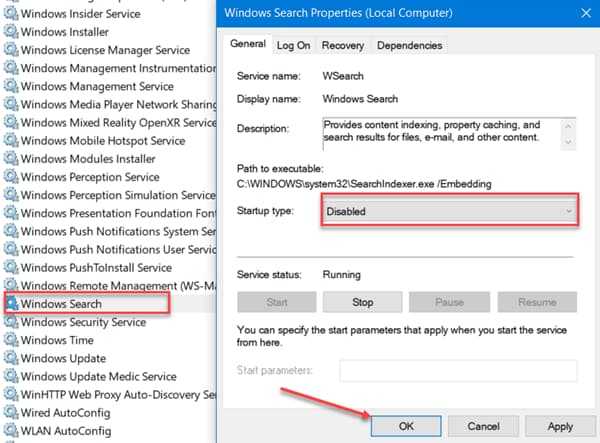
- Now click Apply and OK.
Check the task manager to see if the problem is fixed.
4. Disable SysMain/SuperFetch in Windows 10
SysMain, formerly known as Superfetch is another windows 10 service which can result in a 100% disk usage issue in Windows 10.
If you have heard about Superfetch that you would know that it helps to maintain and improvise system performance over time. However, sometimes it results in high disk issues. So to disable it follow the steps:
Press Windows + X key and open Command prompt (Admin).
Now type the following command and press enter.
net.exe stop sysmain
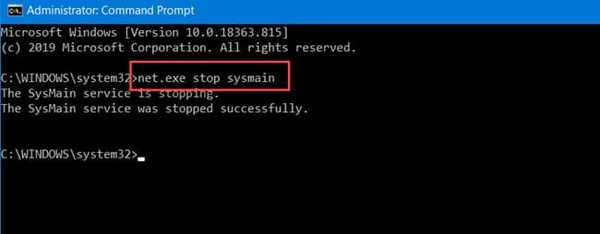
After running this command, wait for some time and open task manager to see the disk usage is getting reduced or not.
If the problem persists, then this service may not be causing the disk usage problem.
Please note that you can use "services.msc" to disable the SysMain service as we have done with the window search service.
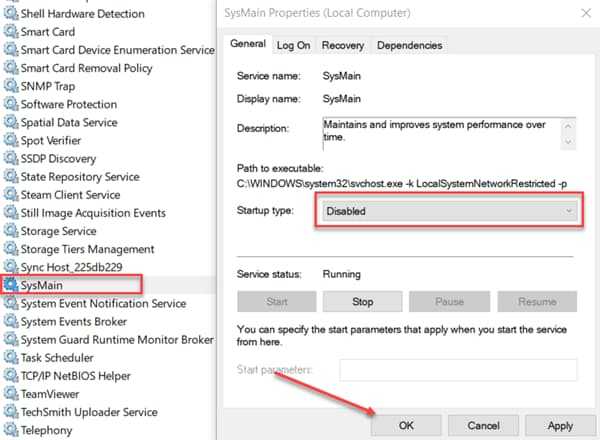
But make sure to look for SysMain in the service list not Superfetch. Superfetch is renamed as SysMain with recent updates of Windows.
5. Perform a disk check
Scanning the disk for errors using the built-in utility provided by Windows 10 comes very handy. It is one of the best ways to fix 100% disk usage in Windows 10.
This utility checks for any disk-related issues that might be causing this issue.
Follow these steps:
Open Command prompt as admin.
Now type the following command and press enter
chkdsk.exe /f /r
- As soon as you press enter, it will display a message that the current volume is in use. And will ask if you would like to run on the next startup.
Now press y and restart your pc.
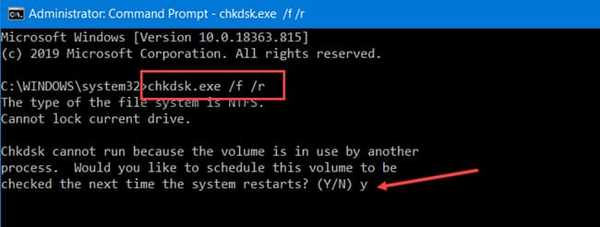
- As soon as your PC restarts, it will check the disk for any problems and also try to repair them.
It will display the results after a successful boot. After that, check your task manager and see if the problem persists.
6. Fixing the StorAHCI.sys Driver
A bug in Microsoft AHCiI driver also results in a 100% disk utilization in Windows 10. Moreover, it can also result in the Blue screen of death or BSOD errors.
Basically, StorAHCI.sys is intended for storage devices connected to the PC via AHCI (Advanced Host Controller Interface) PCI-Express.
Follow the steps to fix the issue:
Open Device Manager by Windows + X key simultaneously and then select Device Manager.
Now look for IDE ATA/ATAPI controllers and expand the list.
Right-click on Standard SATA AHCI Controller and click Properties as shown in the screenshot.
Under the Driver tab, click driver details. Now check it the driver is listed as:
C:\Windows\system32\DRIVERS\storahci.sys
If yes, then you could be affected by the bug. Close the Driver file Details Window.
Now head over to Details tab as shown in the screenshot.
Choose the ‘Device instance path’ from the property dropdown menu. Right-click on the value listed in the Value field and select copy.
Next, press Windows + R key simultaneously to open the run windows. Type "regedit" and press enter.
Go to
HKEY_LOCAL_MACHINE\System\CurrentControlSet\Enum\PCI\. Look for the value you saw in the Properties and expand the relevant key. Make sure you expand the correct key.Once you have found the correct AHCI Controller using the given string, navigate to:
Device Parameters\Interrupt Management\MessageSignaledInterruptProperties
- Now, click on ‘MSISupported’ and enter 0 in its ‘Value data’ box. Click on ‘OK.’
Now restart your PC and see if it fixes the 100% disk utilization issue.
7. Disable Flash to Fix 100% disk usage
Flash is already a thing of the past in the modern web. It is one of the most vulnerable aspects when it comes to web technologies.
And sometimes, the flash also tends to result in a high disk utilization issue in Windows 10.
So, it is better to disable flash on browsers or if you have Adobe Flash installed, you should uninstall it to see if the issue is fixed.
To disable Flash in Google Chrome follow the steps:
Open Google Chrome.
Now open the menu by clicking on the three dots at the top right of the screen. Then, click Settings.
Head over to Privacy and security and click site settings.

Now click Flash to open flash settings.
Toggle off option and you are good to go.

Restart your browser and open the task manager to see if it works.
8. Reset Virtual memory
If there isn’t enough RAM to perform a task, the HDD is used to supplement the RAM. Virtual memory is a combination of RAM and hard disk space and can cause high disk utilization. So resetting the virtual memory is known to fix the problem.
Follow the steps:
Press Windows + Pause/Break key simultaneously to open System information.
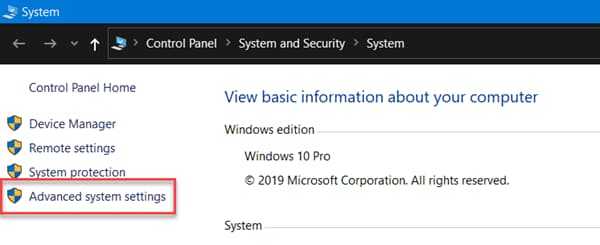
On the left side, click Advanced System Settings.
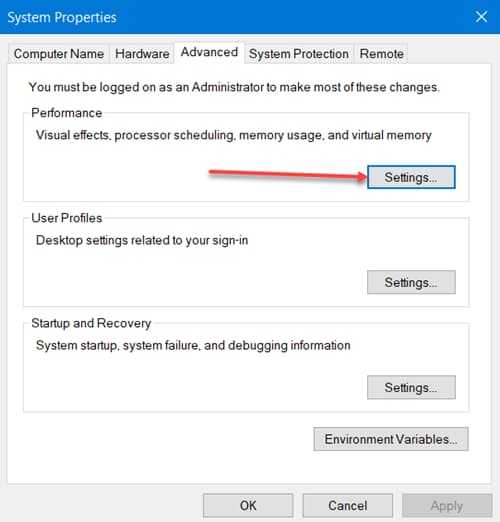
- Now under the Advanced tab, and click Settings under the performance option.
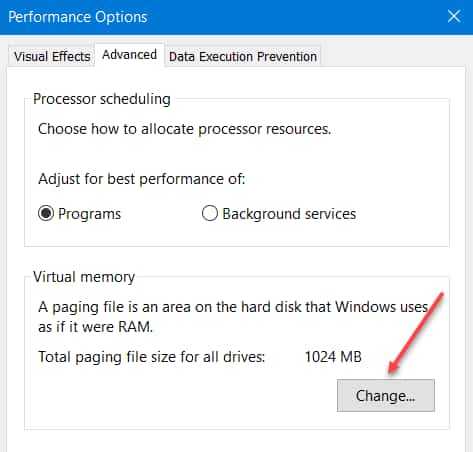
- In the performance options window, head over to Advanced tab and click change as shown in the screenshot below.
- Uncheck "Automatically manage paging file size for all drives" and select custom size and set the initial and maximum size.
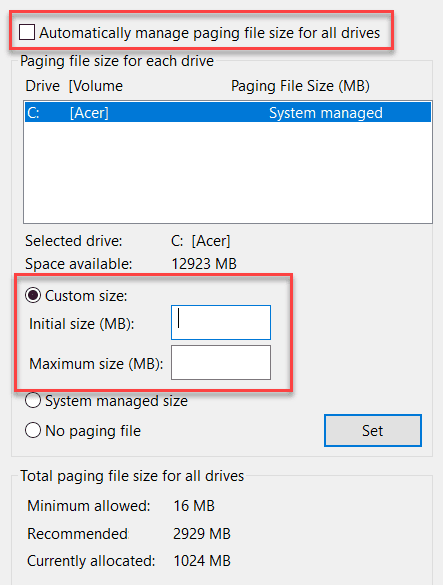
Initial size: this value can vary depending on your computer. If you're not sure what value to enter, just enter the recommended number.
Maximum size: it is recommended to set this value 1.5 times the size of your physical RAM. If your PC has a 4GB (4096 MB) RAM, the value should be no more than about 6,144 MB (4096 MB x 1.5).
Click Set and then OK. Now you need to clear the temporary files that are using the previous virtual memory allocation.
Open the Run window by pressing Windows + R key simultaneously. Enter “temp” and press enter.
In the temp directory, press ctrl + a to select all files and press delete on your keyboard to delete the files.
Now wait for some time and see if the 100% disk usage issue in Windows 10 is fixed.
9. Change Power Options
Sometimes changing the emery options also fixed the problem.
Follow the steps:
Press Windows + X key simultaneously and select Power Options.
Now on the right side, click on Additional Power settings as shown in the screenshot below.
Select High performance.
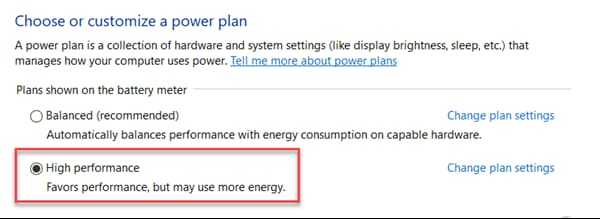
Now check it changing the power options fixes 100 percent disk usage problem.
10. Scan or Disable Antivirus Software Temporarily
If your pc is not working well, then the first thing you should do is scan for malware or virus.
If your computer is infected by a virus or malware, then it will degrade your windows 10 performance for sure and leads to errors like high disk usage and blue screen errors that often require you to boot Windows in Safe Mode.
So try running the scan and see if the problem is fixed.
If your PC ins not infected by malware or virus, then try disabling your antivirus to see, if it is causing the issue.
11. Disable Windows Tips, Tricks And Suggestions
Windows 10 Tips, Tricks, and suggestions feature is also linked to getting a 100% disk usage issue.
So it is better to disable them and see if the problem is fixed. You can disable tips, tricks, and suggestions by navigating to Settings > System > Notifications & actions.
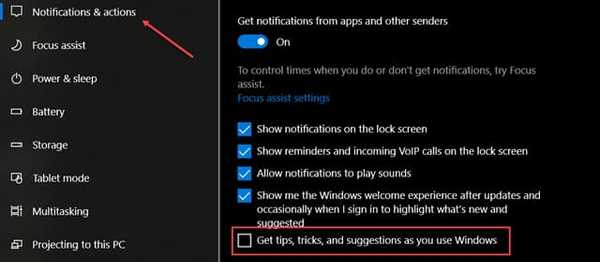
Turn off Get tips, tricks, and suggestions as unchecking the checkbox as shown in the screenshot.
Conclusion: Fix 100% Disk Usage With these guide
That's all! These were the steps that you can follow to fix 100% disk usage in Windows 10.
First check the task manager, if the problem is caused by any third-party software. uninstalling it might work for you and you don't need to follow all these methods.
Read: How to Fix Realtek HD Audio Manager Missing in Windows 10
And in case after following all these methods if your problem is not fixed then consider resetting your PC.
If you have any suggestions and queries, then let me know in the comment section. If this guide helped you, then consider sharing it.
