Ultimate Guide To Free Up Hard Disk Space on Windows

Are you looking for how to free up hard disk space on Windows 10, there here is a complete step-by-step guide to free up space on your Windows PC.
If your Windows 10 PC running low on space, then here are some of the best ways to recover some of the space. Windows 10 has quite a few built-in utilities to help you clean up temporary data and recover some hard disk space.
Moreover, you can also disable some of the features that you don't use or is of little value to you and save a ton of space. You can also move data to the cloud or other drives.
So, in this article, we will be sharing 12 best tips to free up hard disk space on Windows 10 PC. So let's get started.
1. Free up space by emptying Recycle Bin on Windows 10
The first and foremost thing you should do is get rid of deleted files stored in the Recycle bin. Without even knowing the recycle bin can take a huge amount of your hard disk space if you are deleting files and not emptying your recycle bin.
To empty the recycle bin in windows 10 to recover space follow the below steps:
- Open the Start menu and search for Recycle bin and click to open it.
In case, if this doesn't work then open windows explorer using Windows key + E shortcut. And then click on the icon in the location bar and select Recycle bin from the drop-down as shown in the below screenshot.
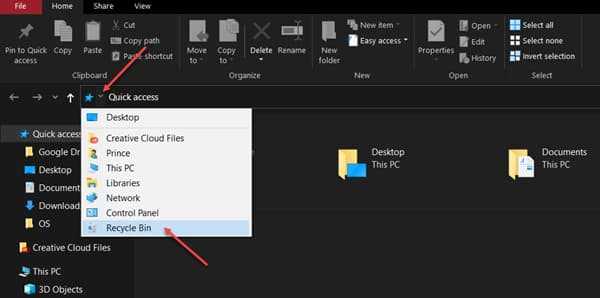
- Now if you have any content in the recycle bin and click on the Empty Recycle Bin at the left-hand corner of the screen to empty the recycle bin.
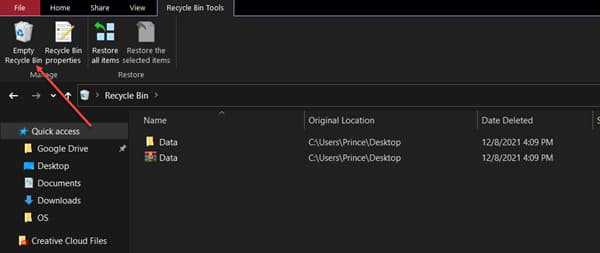
Assuming you had files in your recycle bin, you will notice recovered space based on the size of the data in the recycle bin.
2. Free up Disk space deleting junk files using Storage Sense
One more way to clean and free up space on Windows 10 is to use the Storage sense tool built into Windows. The best part is that you can also enable Storage sense to automatically remove temporary files and empty recycle bin to recover disk space.
To run Storage space follow the following steps:
- Open start and search for Storage settings.
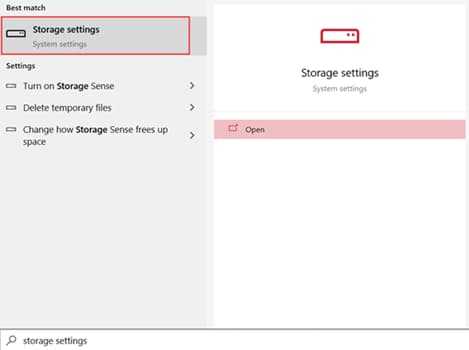
- In the Storage settings page, enable Storage sense to free up space automatically.
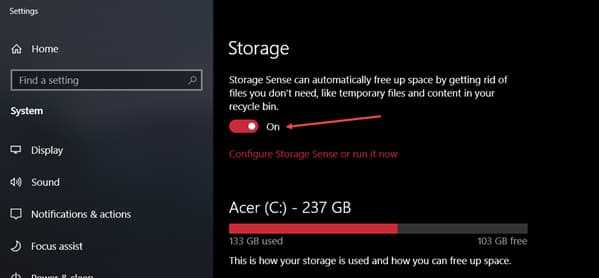
- Moreover, click on "Configure Storage sense or run it now" to configure it. Now under Run Storage Sense, select the desired option.
Now it will automatically run based on the schedule option you selected.
Now Under the "Temporary Files" section, check the "Delete temporary files that my apps aren't using" option.
You can also select when your recycle bin should be emptied. Select based on your preference.
Moreover, if you want you can also select when to delete files in the downloads folders. If you don't want to automatically delete files in the Downloads folder then choose Never from the dropdown options menu.
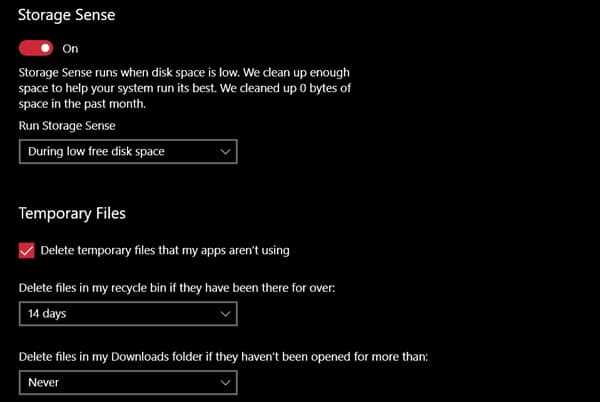
- Lastly, you can also run Storage sense now and free up space by clicking on Clean now.

Storage sense is an excellent way to automatically delete temporary files and empty the recycle bin and recover disk space on windows.
3. Free up Hard Disk space deleting temp files using Disk Cleanup
Disk Cleanup is a built-in tool that you can use to free up disk space in Windows 10. You can clean temporary and unimportant system files using this utility.
To recover space with disk clean up follow the below steps:
Open Windows explorer you can use the Windows key + E shortcut. Now select This PC from the left-hand side navigation pane.
Now right click on the drive that you want to clean up and select properties.
Next click Disk cleanup as shown in the screenshot.
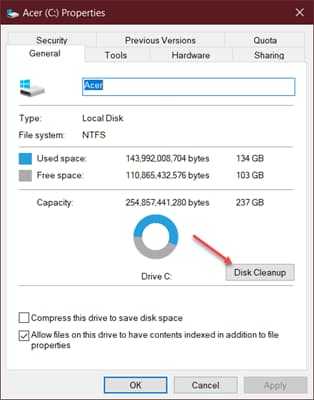
Now wait for the analysis to complete and select the files to delete.
Moreover, select Clean up system files to further clean your drive and delete unwanted files like windows update files.
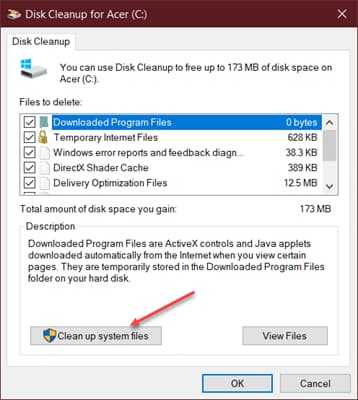
Now wait for the analysis to complete and select the files that you want to delete.
After you have made your selection, click "OK". Now a confirmation dialog will open, click on delete files to confirm your action.
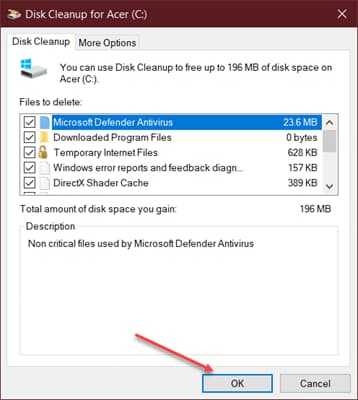
Wait for the clean-up to complete. If you have not used this utility for quite some time. Then this will help you recover lots of disk space.
Moreover, if you recently updated your Windows, then it will also help you delete those downloaded Windows update files and free up space.
4. Free up space by uninstalling Apps and Games
The best and easiest way to free up space on your pc is to uninstall apps and games that you don't use or no longer need. Moreover, you may want to know which app or games that are taking the majority of the space on Windows 10. And based on that you can make your decision if you want it or not.
To find big installed games or apps and to uninstall them follow the below steps:
Open Start and search for Storage Settings and click on it.
In the Storage settings window, wait for the analysis to complete. Once completed, click on Apps & features.
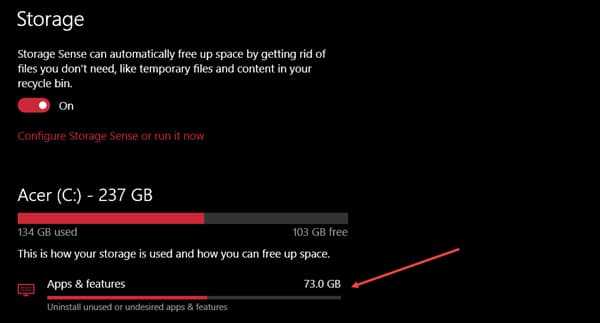
- Now in the Sort by dropdown select Size. Now you can find all the apps and games that are taking more space and the space taken will be displayed in front of them.
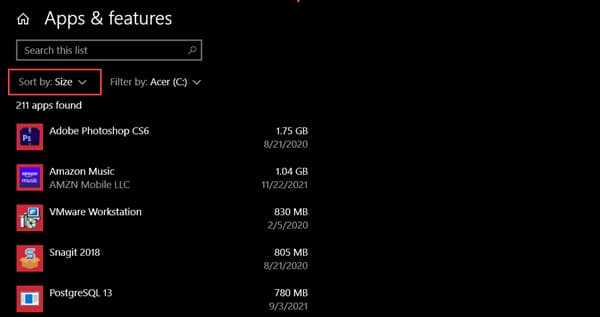
- Now click and uninstall every app or game that you rarely use or you don't need.
Uninstalling apps and games is surely one of the best and quickest ways to free up space on Windows 10.
5. Analyze Disk Space and Delete Unnecessary files
You can use a disk space analyzer to find out what is taking up space on your hard disk. WinDirStat is one of the best disk space analyzers for windows which is a fast, free, and easy to use program.
After you have installed WinDirStat, open it and select the disk which your want to analyze, and click ok.
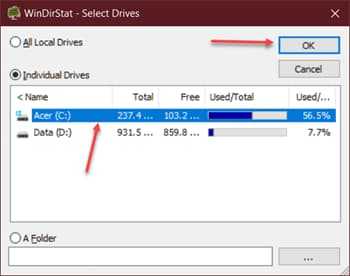
Now, wait for the process to complete. Once completed, you can see all the files and folders that are using your hard disk space.
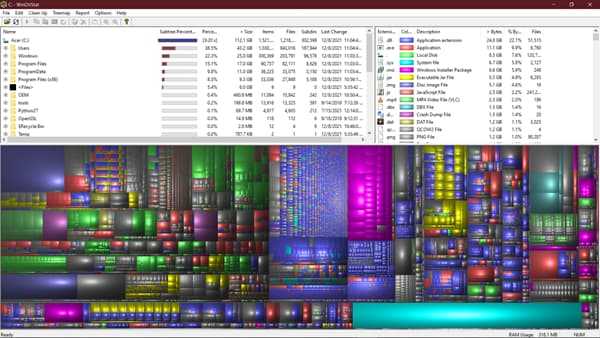
Make sure not to delete system files and folders. To delete a file or folder, right-click on the particular file and select delete. All in all, it is one of the best disk space analyzers for windows to free disk space.
6. Free Up Space by Moving WSL To the Secondary Drive
If you are using Windows Subsystem for Linux then it will be taking a lot of your primary disk space, so in that case, you want to move it to your secondary drive.
And if your primary drive is a low-volume SSD then moving it to a secondary drive makes more sense as it might be taking more than 20-40 GB of space depending on your usage.
To move WSL to secondary drive follow the below steps. In these following steps, we will be moving WSL to D:\WSL\Ubuntu. You can always make the desired location change in the steps.
Open Powershell as an administrator.
Now check the name of your Linux distribution and make sure you remember the complete name. Use the following command:
wsl --list
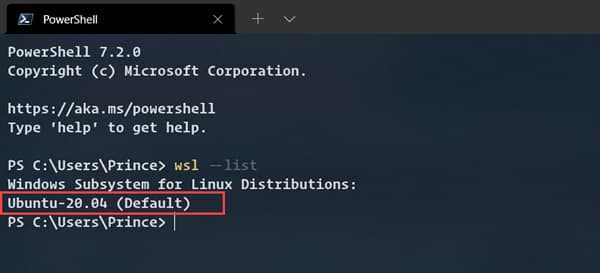
- Now shut down your wsl distribution using the following command.
wsl --shutdown
- Now type the following commands one by one.
cd D:\mkdir WSLcd WSLwsl --export Ubuntu-20.04 ubuntu.tarwsl --unregister Ubuntu-20.04mkdir Ubuntuwsl --import Ubuntu-20.04 Ubuntu-20.04 ubuntu.tar
Make sure to replace Ubuntu-20.04 with your Linux distribution name from step 2.
Now, wait for the moving of wsl to complete and make sure you do not exit the Powershell windows or abort the process.
Once the process is complete. The default user will be root now. But you can follow the below steps to restore and set the default user that you were using earlier for the moved WSL distribution.
Press Windows key + R shortcut to open run command and type regedit and press enter.
In the registry editor window, head over to the following location. And there check your distribution name.
HKEY_CURRENT_USER\Software\Microsoft\Windows\CurrentVersion\Lxss
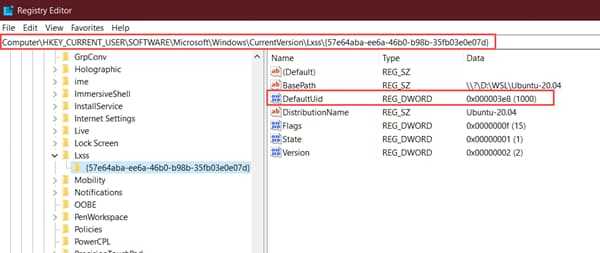
- Now double click on DefaultUid and change value to decimal 1000 (or hex 3e8) as shown in the screenshot.
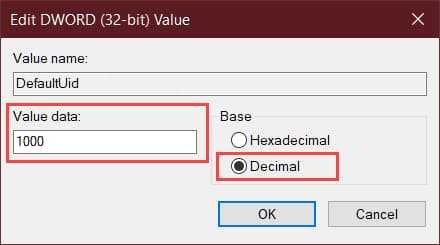
- Once you do that try starting Ubuntu using the following command.
wsl -d Ubuntu-20.04
Now you will have recovered a lot of disk space and your WSL will be working fine as well. If you are using WSL, this step is the best way to free up disk space.
7. Free up space using Finding and Removing Duplicate Files
Another way to free up disk space is to find and remove duplicate files. You can manually do this but it is not feasible. So there are tons of tools available to find duplicate files and folders like Duplicate Cleaner Pro.
Duplicate Cleaner Pro is a paid tool but it has a 7-day free trial which you can use to find and remove duplicate files and folders.
It can scan and find any type of files and remove them as you like.
8. Free up space by disabling Reserved Storage on Windows 10
Microsoft introduced the Reserved storage feature in Windows 10 version 1903 and may or may be enabled by default. Reserved storage as the name suggests reserves a few GBs of disk storage for downloading and storing Windows 10 feature updates.
And it can take lots of Disk space without you even knowing it. So if you have this feature enabled then you can disable the reserved storage feature to free up space on your Windows PC.
To check if Reserved storage is enabled on your system, open Powershell as an administrator and run the following command.
DISM /Online /Get-ReservedStorageState
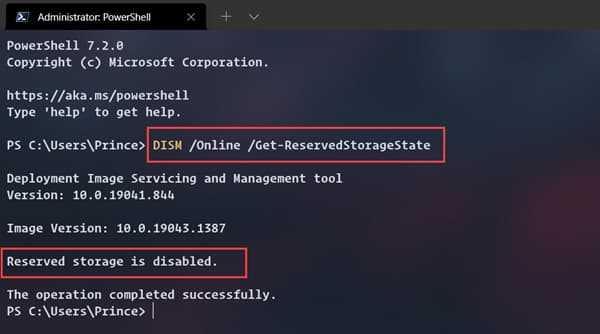
If the Reserved storage is enabled for your system then you can disable it by running the following commands in Powershell.
DISM /Online /Set-ReservedStorageState /State:Disabled
Now, in case you again want to enable this feature then you can use the following command.
DISM /Online /Set-ReservedStorageState /State:Enabled
Disabling reserved storage can save you a few gigabytes of precious disk space and it is invaluable if you are using a low storage SSD as your system drive.
9. Free up Disk space by cleaning temporary files
Previously we have already talked about using Disk Cleanup to clean temporary files but the thing about disk cleanup is that it doesn't clean temp files used by other programs.
So, to clean up temp files used by other programs like browser caches you can use a tool like CCleaner. CCleaner is an excellent tool to clean temporary files and free disk space with just a few clicks.
10. Free up space relocating content to an external drive or cloud service
One of the best ways to free up disk space is to move your content from internal drives to an external drive or cloud. You can use any of the cloud services that you want and move your data from your pc to cloud storage with free clicks.
Almost all the cloud service providers have desktop clients that you can install and they allow you to select which folders you want to sync to cloud storage.
And once they are synced to the cloud they provide you the option to remove the uploaded content from the local drive and free up space with just a click.
All in all, it is one of the best and easiest ways to free up your local drive space on windows.
Moreover, if you have any secondary drive you can configure it to save content on the secondary drive by following the below steps.
Open Start and search for Storage settings.
In the storage setting windows, under More storage settings click on "Change where new content is stored" option.
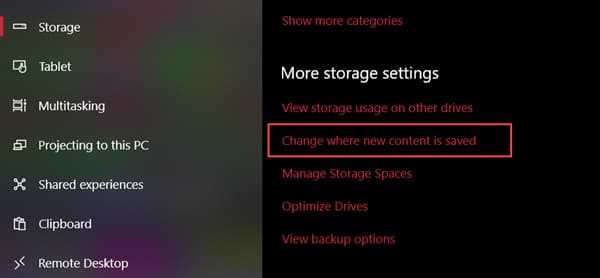
- Now in the next windows, change the default location to the secondary drive from the dropdown for each option and apply to save.
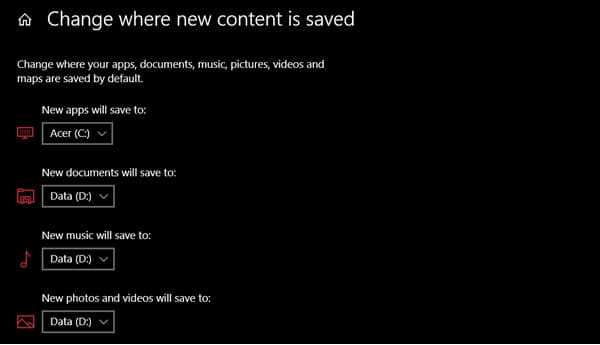
Now please keep in mind that if you are using SSD as a primary drive and HDD as a secondary drive, then you may not want to store your apps on the secondary drive as it impacts performance. So for all others, you can safely select the secondary drive as the location and keep the primary drive for the apps.
11. Reduce the Amount of Space Used for System Restore
If you are short on storage then you can check and reduce the amount of disk allocated by Windows for system restore. To reduce the space allocated for system restore follow the below steps:
Open Setting. You can use the Windows key + X shortcut and select Settings.
Now then select System and then select About.
In the About settings page, click System protection under Related setting located on the right side.
Under the System Protection tab, click Configure.
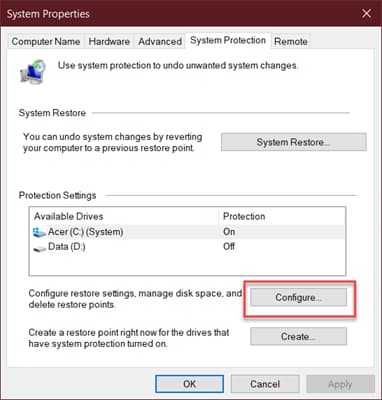
- And under Disk space usage change the allocated space as desired.
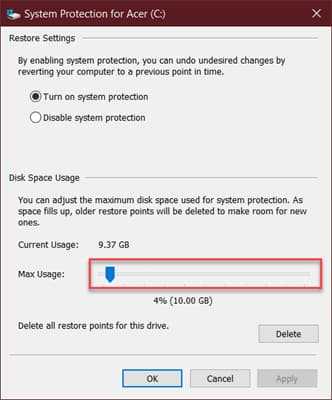
Please keep in mind that this comes at a cost. That is you will have fewer restore points and few previous copies to restore your system from.
12. Recover space disabling Hibernation on Windows 10
If you have scanned your hard drive using WinDirStat then you might have noticed a file name hiberfil.sys which is taking a few GBs of space.
hiberfil.sys is a file that Windows uses to store a copy of the system memory on the hard drive when the hybrid sleep mode is enabled.
The hiberfil.sys is located at the root of the drive where Windows is installed and is hidden by default. You can safely delete this file or disable Hibernation to prevent windows from creating it again automatically.
To disable Hibernation follow the below commands in the Powershell. Make sure to run Powershell as administrator.
powercfg.exe /hibernate off
In case you want to enable hibernation again then use the following command.
powercfg.exe /hibernate off
You can always use sleep mode instead of hibernating mode. So, disabling hibernate might help you if you use sleep mode and not hibernate mode.
FAQs
How do I free up disk space on my PC?
Removing unused or big apps and games, clean temporary files, finding and cleaning duplicate files, disabling certain Windows features are some of the ways to free up disk space.
What is taking up space on my hard drive Windows 10?
WinDirStat is one of the best tools to analyze your disk and find out what is taking hard disk space. It is a completely free and easy to use tool.
How to Delete unnecessary files in Windows?
To delete unnecessary files in Windows 10, 7 and others you can use Windows built-in utilities like Disk cleanup, storage sense and you can even configure them to remove temporary files automatically.
Free Up Disk Space and Boost Your PC Performance
That's all! These were the 12 different ways to free up disk space on your windows 10 pc. Most of the methods are straightforward and don't require any third-party software.
Moreover, some methods involve writing commands in Powershell or command prompt and making sure to run those commands as an administrator. All in all, these methods will certainly help you recover some free space.
Are there more methods or tips that you like to suggest? If yes, then please let us know in the comment section.
And if you liked the article, consider following us on Twitter to get the latest tech news and updates.
