How To Take a Screenshot on Windows 10
Learn how to take a screenshot on windows 10 because screenshots are useful, and sooner or later you going to need a screenshot.
No matter, if you are using a computer for personal or businesses use. Knowing how to take screenshots on Windows will surely help.
A screenshot is an image of whatever on your screen. Windows begin the most popular platform offers many inbuilt options, shortcuts for taking a screenshot in Windows 10.
Moreover, you can use third-party software with additional features for capturing the screen.
So, in this article, I will show you different ways to take screenshots on Windows 10.
5 Ways To Take Screenshots on Windows 10
How To Take A Screenshot on Windows 10
Method 1: Take a Screenshot on Windows Using the Print Screen (PrtScn) button
One of the fastest and best way to quickly take screenshots on windows is using print screen key on your keyboard.
And for doing this, first, you need to identity print screen button on your keyboard.
The print screen button may have different labels like "Print Screen","PrtScn", "PrtSc", "PrntScrn", "Print Scr", or something very similar.
On a laptop keyboard, you may have to use "Function" or "Fn" key with the print screen key to making it work.
Take Screenshot that automatically gets copied to Clipboard.
When you press the "PrtScn" key or "Fn + PrtScn" key, it will appear that nothing happened, but behind the scenes, the screenshot gets saved to your clipboard.
Now you can paste in any image editor or word processor or any other program you want to use the screenshot.
To test, just open paint or Microsoft word, and press paste or use "Ctrl+V" shortcut. You will see the screenshot will get pasted.
But how you would save the screenshot in your gallery or folder in windows 10. Let’s take a look at the next steps.
Take and Save Screenshot as a File.
Having screenshot saved to the clipboard hardly helps, if you want to save the screenshot in a folder.
Then, press the "Windows + PrtScn." On some laptops and other devices, you may need to press the "Windows + Fn + PrtScn" or "Windows + Ctrl + PrtScn" keys instead.
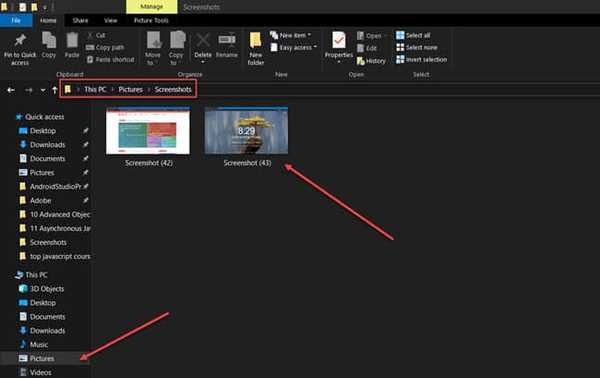
As soon as you press the key, you will notice the screen will dim for a moment., and your screenshot gets saved to the Screenshots folder under Pictures folder.
The screenshot will be named automatically.
To view the saved screenshot on windows 10. Press "Windows + E" keys together to open Windows Explorer.
And then navigate to "Pictures" and inside it open "Screenshots" folder to view the screenshot.
Take Screenshot of Single Window on PC
Let say you have lots of windows open of different programs and you want to take a screenshot of a single window.
To do this, click on the title bar of the window you want to capture. Then press "Alt+PrtScn" keys or "Alt+Fn+PrtScn" keys together.
Now the screenshot will be copied to your clipboard. Open the image editor or document editor and paste the screenshot.
Read: How To Download Instagram Videos and Photos on Android
Method 2: How to Take Screenshots On Windows Using Snipping Tool
Snipping tool is a simple tool created by Microsoft, especially for taking a screenshot for windows. With the snipping tool, you can take four different types of screenshots.
Free-form snip lets you capture a free-form screenshot around an object.
Rectangular snip enables you to capture a rectangular screenshot around an object.
Window snip that allows you to capture a browser window or dialog box and the last is Full-screen snip using which you can capture the full screen.
Also, you can do more stuff with Snipping tool like annotating it using pen and highlighter, include or remove the URL, share the screenshot, or add a delay before it takes the screenshot.
To use the Snipping tool, open it by clicking on the search icon on the left corner of your screen and search for the "snipping tool" in the search bar.
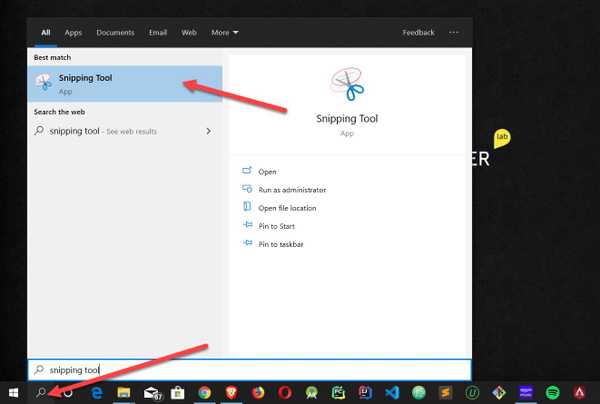
Now select the screenshot mode. And click on new to take a screenshot.
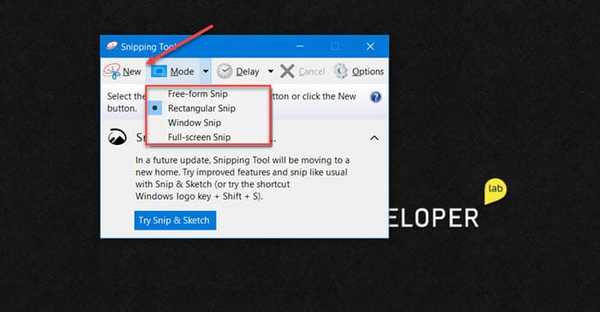
As soon as you click the new option, your screen will fade. Now use your mouse and select the area which you want to snap. Remember, this will be different for different screenshot modes.
Now the screenshot will be taken, and you can annotate and make changes and save it using File >> Save or "Ctrl+S" shortcut.
Method 3: Using Snip & Sketch Shortcut
Snip & Sketch is the new tool introduced for Window 10 in 2018. It is introduced to replace the Snipping tool.
But fortunately Snipping tool is still around, but Microsoft claims it is being phased out.
The difference between the snipping tool and snip & Sketch is not so much, they both offer similar features.
To use Snip & Sketch to take a screenshot on windows 10, follow the below steps.
Open the Snip & Sketch by clicking on the search icon on the left corner of your screen and search for "Snip & Sketch" in the search bar.
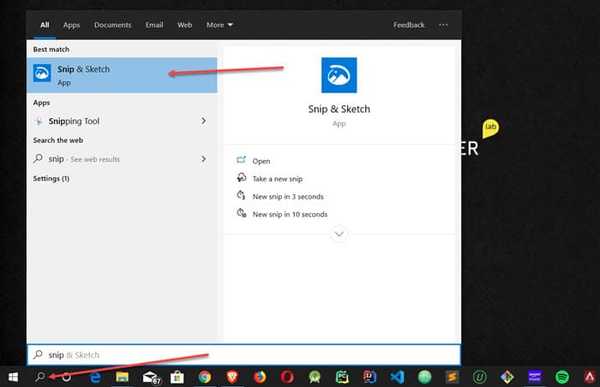
Now click on the "New" button, now select the area which you want to take a screenshot.
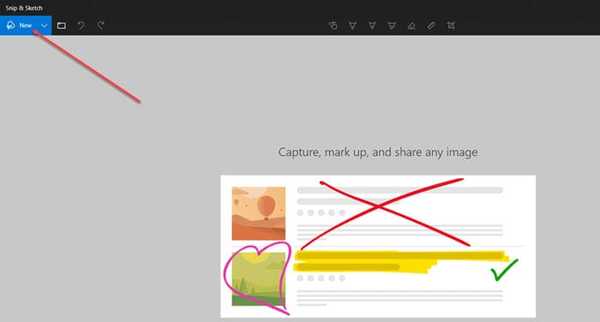
You can also add delays like in snipping tools. Now, annotate or save the screenshot.
Using "Shift+Windows+S" Shortcut to Snip quickly using Snip & Sketch
Now, this is one thing that Snip & Sketch allows that Snipping tools don’t. Although you can explicitly assign a shortcut to snipping tool, that’s is not what I am talking. Let’s get starting to the point.
To quickly take screenshot, Press "Shift+Windows+S" keys together. Now your screen fades, and you will get the option to take the screenshot with different Snipping options.
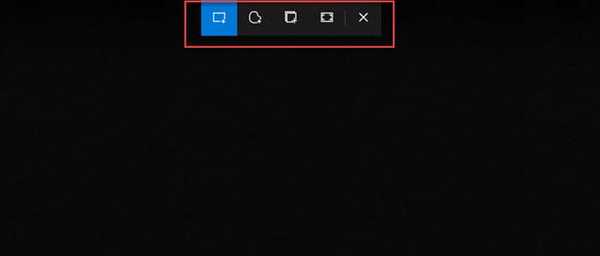
As soon as you take the screenshot, it gets saved to the clipboard, and a thumbnail notification appears, click on it and screenshot will open with Snip & Sketch, now you can annotate or save your screenshot.
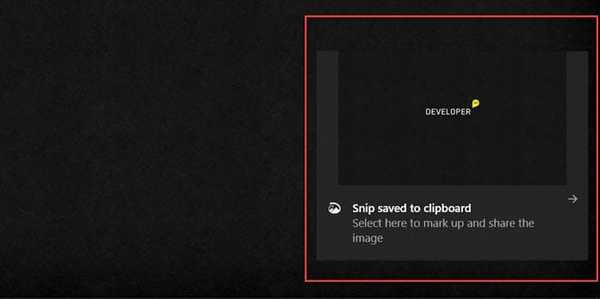
Open Snip & Sketch Quickly With Print Key
If you really like snip & Sketch tool and only want to use this tool, then you can enable an option in windows setting that will assign print screen key to open Snip & Sketch tool.
For doing it, you can go into Windows' Settings app and choose Ease of Access > Keyboard and select "Use the PrtSc Button to Open Screen Snipping".
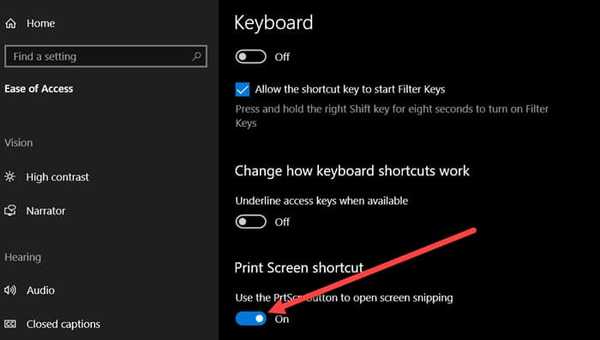
Note that this requires restarting Windows.
Now to take a screenshot in windows 10 with Snip & Sketch, press "Print Screen" key.
Method 4: Taking Screenshots With Game Bar in Windows 10
There is another way to take a screenshot, and that is by using Game Bar in Windows 10.
First, you have to enable "Record game clips, screenshots, and broadcast using Game bar" option by navigation to Settings >> Gaming and then the Game bar.
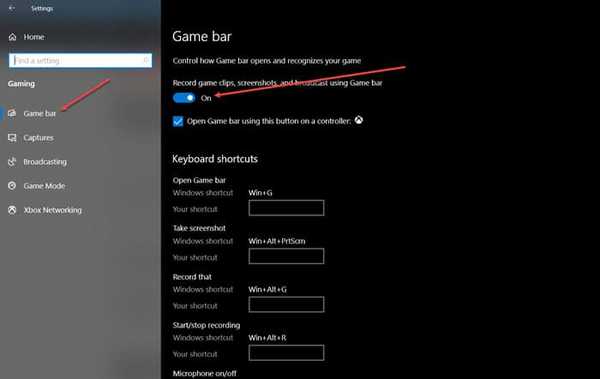
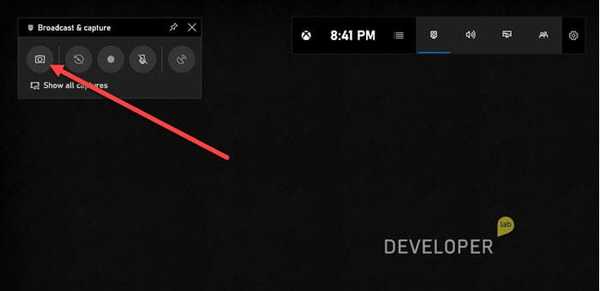
Once you enable the option use "Windows+Alt +G" keys together to take a screenshot. As soon as you press the keys together, the Game bar will appear.
Now click on the screenshot button and the screenshot will be saved.
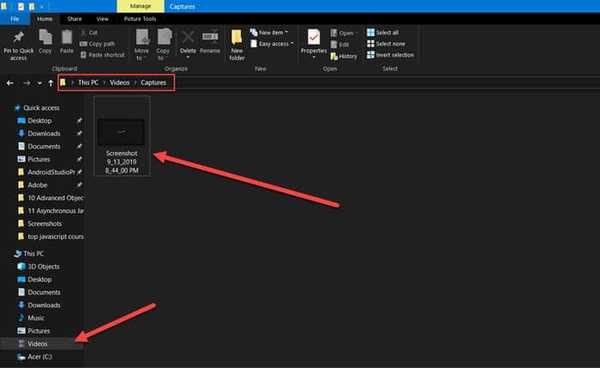
To view the save screenshot, open window explorer or use "Windows + E" shortcut and navigate to "Videos" folder and inside open "Capture" folder to view your saved screenshots
Method 5: More flexible and Powerful Screenshots with Snagit
Snagit is one of the best software for capturing a screenshot. I use Snagit for taking and editing the captured screenshot.
It offers more than any other built-in options provided by Windows. Offered by TechSmith, Snagit cost around 49.95 USD. Snagit also offers a free trial. I would recommend you to download and try Snagit using their free trial.
Snagit also includes advanced features like video and scrolling window screenshot tools.
It offers handy image-editing and drawing tools, including adjusting brightness, drawing different kinds of arrows, text overlay, and borders, and much more.
With Snagit, you can also record your screen or a window. Snagit comes with a separate editor.
When you take a screenshot, it will automatically open it in Snagit editor where you can edit the screenshot and save it.
Open the Snagit by clicking on the search icon on the left corner of your screen and search for "Snagit" in the search bar.
Snagit also comes with different screenshot option which works like a charm for every type of screenshot from taking a screenshot of a whole screen to capturing a specific region.
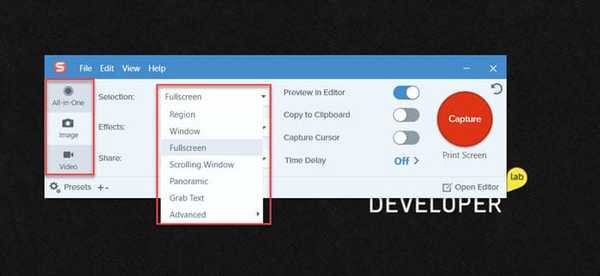
A window will open, and you can choose to capture the screen or record a video. Just select the option you want.

After you have taken the screenshot, it will automatically open it into Snagit Editor, where you can edit the screenshot and save it.
FAQs
How Do You Take a Screenshot on Windows 10?
There are tons of methods to take a screenshot on Windows 10. The easiest and quickest way is to use a shortcut like Windows + PrtSc key combination or by using tools like Snipping Tool.
Where is the Print Screen button?
The print screen button may have different labels like “Print Screen”, ”PrtScn”, “PrtSc”, “PrntScrn”, “Print Scr”, or something very similar. On most computers, you can find the print screen button after the F12 key.
What is the Shortcut To Take a Screenshot on a PC?
Windows + Print Screen key combination is one of the quickest ways to take a screenshot on Windows. Alternatively, you can use the Fn + Print Screen key.
How do you take a Screenshot in Windows without Print Screen?
You can use built-in tools in Windows 10 like Snipping tool or Snip and Sketch programs. Or alternatively, you can Softwares likes Snagit to future customize the screenshots.
How do I use the Snipping Tool?
To use the Snipping tool, open it by clicking on the search icon on the left corner of your screen and search for the “snipping tool” in the search bar. Now select the screenshot mode. And click on new to take a screenshot.
Final Words: Take A Screenshot on Windows
That’s all! These were the best and quickest ways to take a screenshot on Windows 10 instantly.
I hope you have enjoyed this tutorial on how to take screenshots on Windows.
Which way or software you use to take screen?
Let me know by leaving a quick comment below right now.
