How to Fix Realtek HD Audio Manager Missing in Windows 10
Fix missing Realtek HD Audio Manager in Windows 10 with this step by step guide. So let's dig right in.
Realtek HD Audio Manager comes pre-installed with Realtek HD audio drivers on your computer. So if you have Realtek audio drivers installed on your Windows machine, then you probably would also have Realtek HD Audio Manager on your Windows 10 pc as well.
Every computer needs to have an audio driver for using audio devices what Realtek audio manager does it that it provides different options for changing sound settings and managing audio devices.
With these drivers, your audio devices like headphones, speakers etc. are easily detected and configured. You can find the Realtek HD Audio Manager icon on the taskbar, in the system tray or the notification panel.
But sometimes Realtek Audio Manager fails to open, or the icon goes completely missing from the taskbar. These issues can happen after a Windows 10 update or because of some malware.
But there are ways to fix Realtek HD audio manager not opening or missing issues. In this guide, we shall look into various ways to fix Realtek HD manager missing in windows 10.
Fix Realtek HD Audio Manager in Windows 10
Where To Find the Realtek HD Audio Manager in Windows 10?
If you have Realtek audio driver installed on your computer, then you should find the Realtek HD audio manager in the control panel. Follow the following steps:
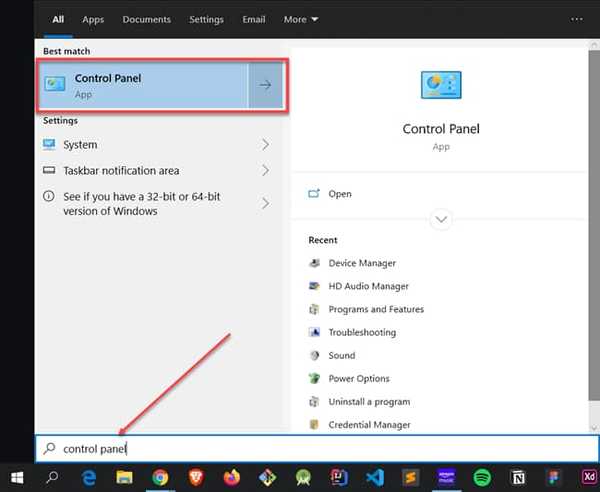
1. Open the Start Menu and start typing control panel.
2. Now you should find the control panel there, click on it to open the Control Panel in Windows 10.
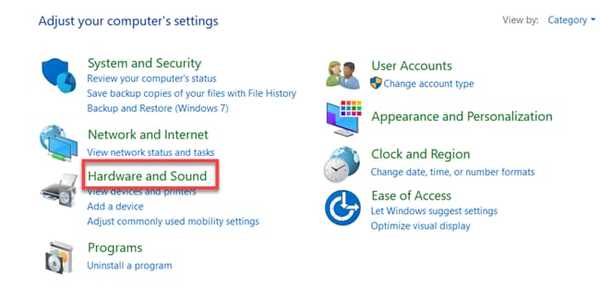
3. Inside Control Panel, click on Hardware and Sound.
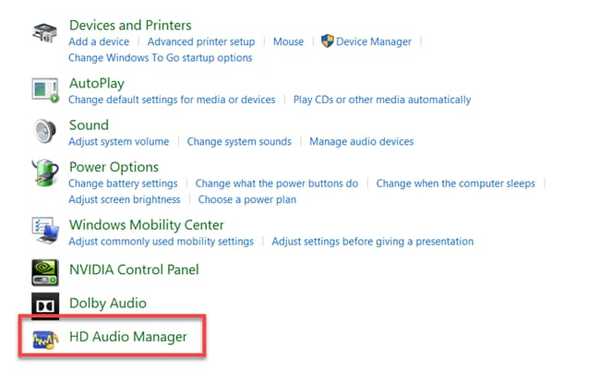
4. Now there you can find Realtek HD Audio Manager by the name Realtek HD Audio Manager or HD audio manager.
Bring Missing Realtek HD Audio Manager Back in Windows 10 Using Control Panel
If you have Realtek HD Audio Driver installed on your computer and you could find the Realtek HD Audio Manager in Windows 10 control panel.
Then you can bring back missing audio manager form the taskbar or in the system tray using the following steps.
1. First of all, open Realtek audio manager from the control panel. (Steps already mentioned above)
2. Once opened, On the right bottom corner, click on the "i" information icon as shown in the screenshot.
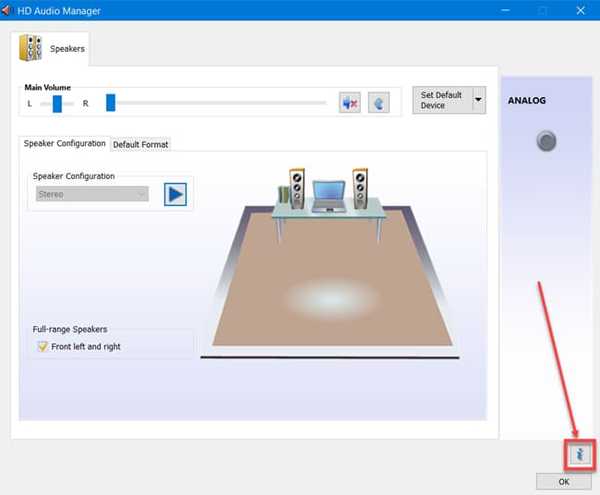
3. In the next window, checkmark the display icon in the notification area as seen in the screenshot and press ok.
![Show Realtek HD Audio Manager in Windows 10 Taskbar]../(images/show-realtek-hd-audio-mananger-taskbar.jpg)
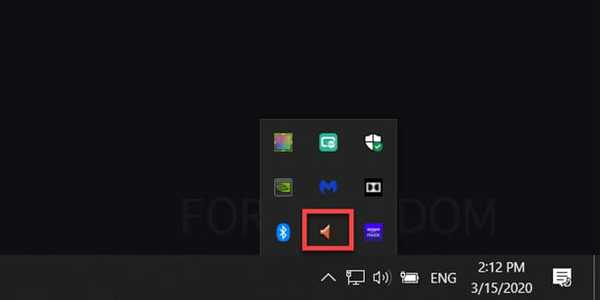
4. Now you should see the Realtek HD Audio Manager on the taskbar or system tray as shown in the screenshot.
What If You Can't Find Realtek Audio Manger in Control Panel?
Now, in case you have installed Realtek audio driver on your computer and still can't find Realtek HD audio manager in the control panel, then follow the following steps.
1. Press Windows + R and enter or paste the following path in the Run window.
C:\Program Files\Realtek\Audio\HDA
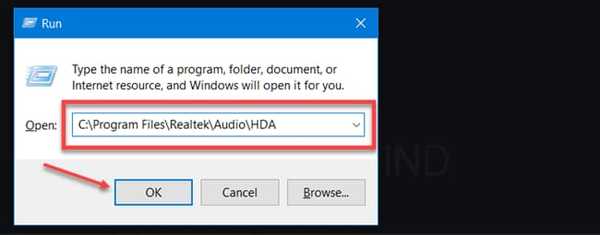
or you can navigate to the folder manually.
2. Now a folder should open. There you should find RtkNGUI64.exe and RAVCpl64.exe file.
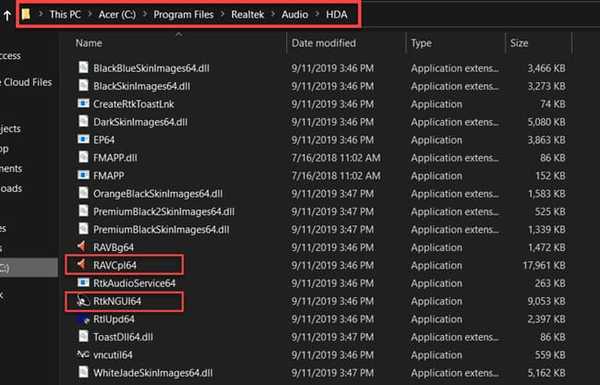
3. Right-click on it and select run as administrator. Do this for both the files one by one.
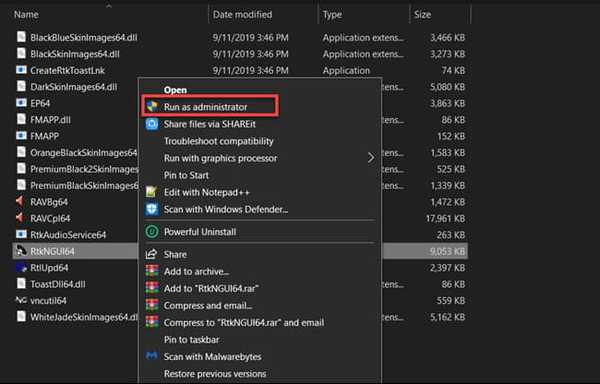
4. Now restart your pc.
Note that RAVCpl64.exe is your Realtek HD Audio Manager.
You should find Realtek HD Audio Manager in the control panel. If this doesn't work, then you need to reinstall the Realtek audio driver. Follow the below steps.
Fix Missing Realtek HD Audio Manager in Windows 10
When you got any issue with Realtek driver, then it is best to reinstall the drivers. The is the first and foremost solution you should try, and this method fixes the error in the majority of cases.
Uninstall Realtek HD Audio Driver
You need to uninstall Realtek audio driver from the drive manager. Here is the step by step guide.
1. Press Windows key + X to open quick-access settings.
2. Now click on Device Manager.
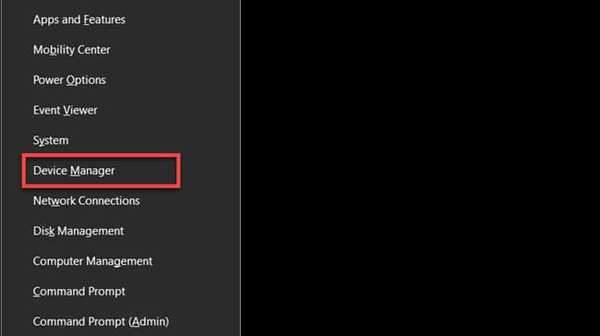
Alternatively, you can also open the device manager by first opening Start Menu, and searching for the device manager.
Either way, to should be able to open the Windows device manager.
3. Now, in the device manager, expand the Sound, Video and Game controllers section. There you will see the Realtek High definition audio.
If you didn't find Realtek high definition audio here, then you might not have installed it on your pc.
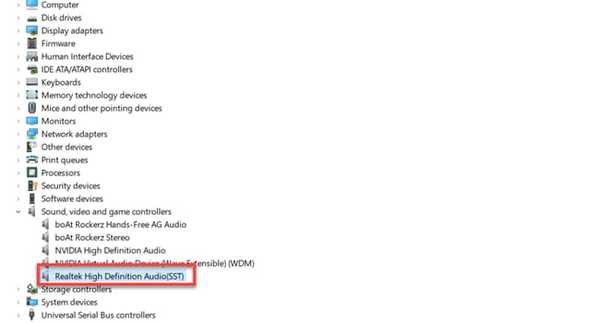
4. Right-click on it and select Uninstall Device.
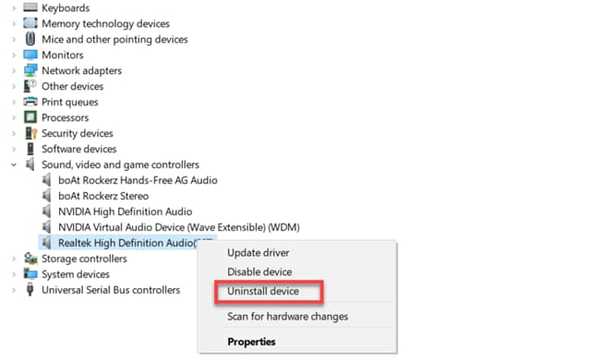
5. Now, delete confirmation popup will open, now check mark delete the device software for this device as shown in the screenshot and click Uninstall.
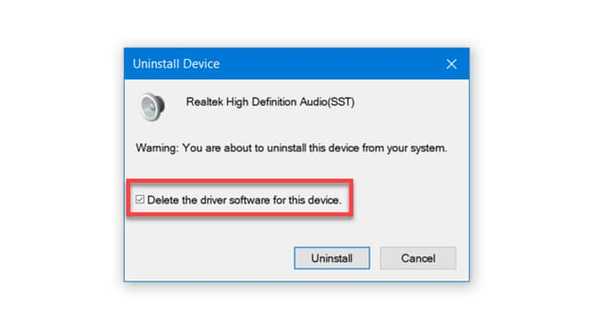
6. Now, wait for the process to complete and restart your computer.
Realtek HD Audio Drivers should be removed entirely from your computer. Now its time to freshly download and install Realtek HD Audio Drivers. Let's proceed to the next steps to fix Realtek HD Audio Manager missing in Windows 10.
Download and Reinstall Realtek HD Audio Driver
Once you have uninstalled the Realtek audio driver from your computer, then follow the following steps:
1. Download the latest Realtek HD Audio Driver.
2. Now right click on the downloaded setup and click run as administrator.
3. Now follow the on-screen installation prompts and Once the installation is complete restart your PC.
4. Press Windows + R and enter or paste the following path in the Run window.
C:\Program Files\Realtek\Audio\HDA
or you can navigate to the folder manually.
5. Inside the folder, right-click on RAVCpl64.exe and select run as administrator.
6. Now your Realtek audio manager will open. On the right bottom corner, click on the information icon as in the screenshot.

7. In the next window, checkmark the display icon in the notification area as seen in the screenshot and press ok.
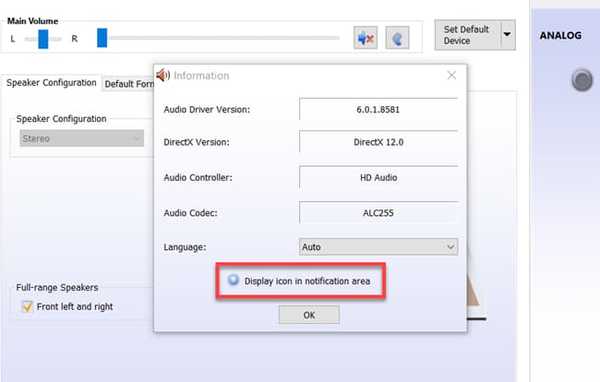
8. Now you should see the Realtek audio manager on the taskbar or system tray as shown in the screenshot.

Alternativey, inside the HDA folder, you can right-click on RAVCpl64.exe file and click on send to desktop.
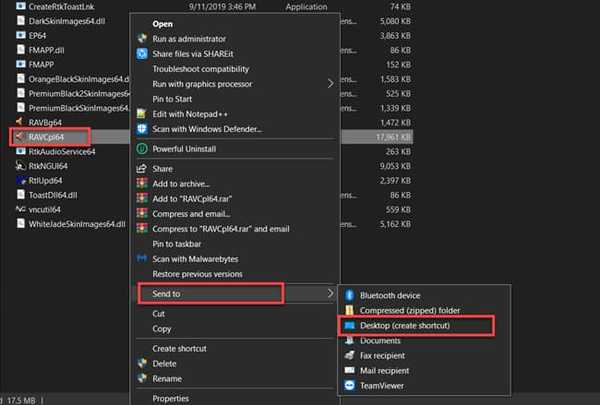
Now you can drag the shortcut from the desktop either to the taskbar and pin it or to the system tray.

That's it you can now use these icons to open Realtek audio manager quickly.
Important Note:
Now by doing this if in case it still doesn't work, then instead of downloading and installing the latest Realtek audio driver.
You should install version 2.81 and follow the above steps (starting from 2).
Many users have reported doing this has fixed their problem. You can download 2.81 version from FileHippo.
FAQs
How do I turn on Realtek HD Audio Manager?
To enable Realtek HD Audio Manager in Windows 10. Follow these steps: 1. Use shortcut keys Ctrl + Shift + Esc to open Task Manager. 2. Select the Startup tab.
Where can I download Realtek HD Audio Manager?
You can download Realtek HD Audio Manager either from Realtek official website or any third party website like Filehippo.
Where is Realtek HD Audio Manager Windows 10?
You can find Realtek HD Audio Manager in the control panel. Follow these steps. 1. Open the start menu and then type and open control panel. 2. Inside Control Panel, click on Hardware and Sound 3. Now there you can find Realtek HD Audio Manager by the name Realtek HD Audio Manager or HD audio manager. Alternatively, you can browse to C:Program FilesRealtekAudioHDA to find Realtek HD Audio Manager.
Do you need Realtek HD Audio Manager?
The answer is NO. Realtek HD Audio Manager is not required when you have no audio issues.
How do I fix Realtek High Definition Audio?
To fix Realtek High Definition Audio, it is recommended to reinstall it to completely fix the issue in Windows 10. 1. First, uninstall Realtek HD Audio Driver. 2. Download and Reinstall Realtek HD Audio Driver
Final Words: Recover Realtek HD Audio Manager
That's it. Follow these steps to fix Realtek HD audio manager missing in Windows 10. Audio Manager gives various options to manage your audio devices and settings effectively.
I hope this guide has helped you in fixing Realtek audio manager related issues in windows. If you need any help or something else worked for you, then please let us know in the comment section.
And if you liked the article, consider following us on Twitter to get the latest tech news and updates.
